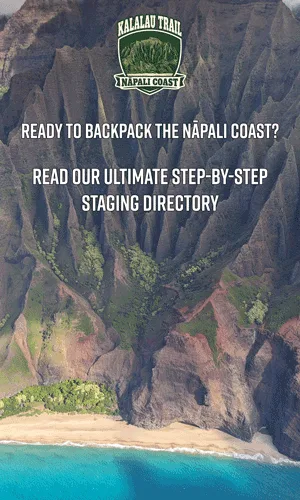
The Na Pali Coast: A Visual Field Guide
Capturing the sheer scale, razor-sharp fluted ridges, and shifting tropical light of the Nāpali Coast is a photographer’s dream. The Kalalau Trail is beautiful, but it requires the right timing and environmental awareness to photograph safely.
Being a Photographer myself, I love to visit and capture new and exciting photos every time. Explore the journey below through our sequential trail milestones and gather critical landscape shooting tips.
First two miles of the Kalalau Trail
 Sven Bannuscher, 2014")
Mile 0 – Sunset over Ke’e Beach
-
Creative Tip: Underexpose for Color: Drop your exposure a bit (using your camera’s exposure compensation dial or by tapping and sliding down on a phone screen). This deepens the shadows, prevents the sky from blowing out, and dramatically saturates the rich oranges, pinks, and reds when you are taking sunset photos at Kalalau or anywhere else.
 Sven Bannuscher, 2014")
Mile 1 – View up the Coast
-
Creative Tip: Time of day doesn’t just change the light on a landscape—it completely changes the emotional story of the photo.
-
Location Note: At the 1 mile mark, you’ll find your first great overlook area (sometimes pretty windy) along the trail. It will look different at different times of day.
")
Mile 1.6 – Stairs leading to beach
-
Location Note: Rains turn the steep, high-clay volcanic soil into an incredibly slick mudslide. Without intervention, hikers would continuously slip.
Hanakāpīʻai Beach and Just beyond
")
Mile 2 – Hanakāpīʻai Beach
-
⚠️ Beach Warning: Do not let the beauty fool you—Hanakāpīʻai Beach is widely considered one of the most dangerous beaches in Hawaii. Because there is no protective outer reef, this cove faces powerful, direct ocean swells that generate lethal, invisible rip currents.
")
Mile 3.7 – Seeing Through Trees
-
Location Note: When you leave Hanakāpīʻai, you’ll be walking uphill for quite a while. Your view will often be blocked by trees, but every once in a while, you’ll get to see through the trees at beautiful vistas or cliffs. Take the time to capture some of those images. Plus it will give you a break from your climb.
")
Mile 4.1 – Looking toward Ke’e
-
Creative Tip: It is so easy to default to a wide-angle lens when you’re standing in front of a massive landscape, but relying on it too much can actually make an epic scene look small, distant, and flat. Switching to a telephoto lens (zooming in) completely changes the game through a visual property called lens compression.
Approaching Hanakoa
")
Mile 5 – Near Waiahuakua Stream
-
Creative Tip: When you are deep inside a lush forest or jungle, it is incredibly easy for photos to turn into a messy, overwhelming wall of flat green. Use depth layering and geometry to give a chaotic natural environment an immediate sense of order and three-dimensional depth.
")
Mile 5.5 – View before Hanakoa
-
Creative Tip: Freeze the action. Whether it’s a hiker fighting their way up Red Hill or crossing a rushing stream, placing something in motion gives a massive landscape instant scale and narrative. Use a fast shutter speed (1/500 or higher) to capture the raw effort against nature.
")
Mile 6 – Hanakoa
-
Creative Tip: To capture a vibrant rainbow, don’t just shoot the sky—use a polarizing filter, allowing you to dramatically saturate the rainbow’s colors and make it pop against a dark, dramatic sky. If you’re shooting with a phone, drop your exposure slightly to keep the bright colors from washing out.
Crawler’s Ledge
")
Mile 7 – Mile Marker
-
Creative Tip: While tight shots isolate details, a wider landscape shot can add crucial context and “text” to your image’s story. By pulling back, you don’t just show a subject—you show their relationship to an environment.
-
Location Note: This marker is the gateway to the area that is called Crawler’s Ledge. While it is dangerous, it’s not as bad as “GoPro” videos make it look with their ultra-wide fisheye lens distortion. The type of lens that a photographer uses make a big difference in how the photo (or video) comes out.
")
Mile 7.2 – Detail on the Ledge
-
Creative Tip: When you want to convey the difficulty or raw emotion of a journey, look for the roughest, most textured surface around. Make it massive in your foreground to force the viewer to mentally “feel” the grit of the trail before their eyes even travel into the rest of the scene.
")
Mile 7.4 – The Hidden Hazard
-
⚠️Location Note: Don’t let your guard down after clearing the hard rock of Crawler’s Ledge. The transition zone right after it features an incredibly narrow trail carved into steep, loose volcanic sand that is actively eroding and falling away into the ocean cliffside. While the rock ledge gives you solid traction, this section offers almost zero grip. Take slow, deliberate steps, lean your weight slightly into the mountain slope (not away from it), and ensure your trekking poles are securely planted before moving your feet.
The Pōhakuao Stretch
")
Mile 7.7 – Pōhakuao Stream
-
Creative Tip: Next time you find a great view, don’t just stand there. Drop down on one knee or place your camera directly on the ground, tilt the lens slightly upward, and watch how a standard trail shot instantly transforms into a dramatic, larger-than-life composition.
")
Mile 8.7 – Coming into View
-
Creative Tip: Atmospheric perspective (also called aerial perspective) is a visual phenomenon where distant objects appear lighter, less detailed, and bluer than objects close to you. It is caused by light scattering off particles like dust, moisture, and smoke in the air.
")
Mile 8.2 – Kalalau Sign
-
Location Note: The iconic, hand-carved wooden gateway sign at Mile 8.2 was crafted and installed by dedicated local trail stewards to mark the formal entrance into Kalalau Valley. It serves as a symbolic milestone, welcoming backpackers after they cleared the dangers of Crawler’s Ledge.
Red Hill
")
Mile 8.3 – View of the Beach
-
Location Note: Once able to be seen from right above the gateway Kalalau sign, growing trees have since obscured the first view of the beack. Now, your first clear glimpse of the beach unfolds just a bit further down the trail.
")
Mile 8.8 – Goats
-
Creative Tip: To make wildlife pop out, use a long telephoto lens and shoot wide open (f/2.8 or f/4). A shallow depth of field instantly melts a distracting background into a smooth canvas of color, keeping total focus on your subject.
")
Mile 10.2 – Remnants of loʻi kalo
Location Note: Because these walls are sacred archaeological sites protected by strict state and federal laws, there is a major “no-touch” policy.
⚠️ State Park Law: Under no circumstances should you climb over, sit on, or move stones from these walls.
Kalalau Beach
")
Shady Camping Areas
-
Creative Tip: Use overhanging branches as a natural frame to add instant depth, drawing the viewer’s eye straight to the subject (ocean in this case).
-
Location Note: There are pleanty of shady camping areas at Kalalau Beach. There’s no problem finding flat areas for tents or trees to hang hammocks from.
")
Beautiful Sunsets
-
Creative Tip: Use a fast shutter speed to freeze crashing shorebreak waves, transforming chaotic ocean spray into sharp, dramatic sculptures of light.
")
Discover Rainbows
-
Creative Tip: Use leading lines to guide the eye. In this photo, the sweeping curve of the beach forest and the towering, jagged ridge lines run perfectly parallel, creating a powerful visual highway that directs your focus straight toward the rainbow.
- Location Note: Every day, at Kalalau Beach you’ll see different, wonderful views.